Tom's BIC 940 Record Changer Repair Guide
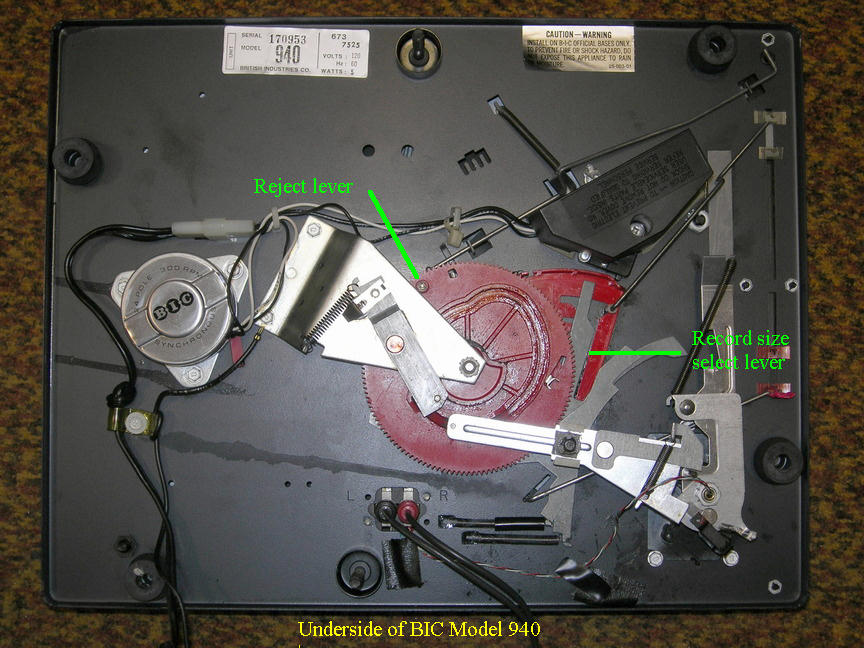
Welcome to my webpage for those interested in getting their old BIC record changers from the mid-1970s back in operation. They're great machines, but age has left many of them running poorly or not at all. I have been an electronics hobbyist and electronics technician specializing in audio equipment for many years. What I will tell you here is particularly based on my experience with keeping a pair of Model 940s in operation. The same solutions to common problems will likely apply to other models in the line, as well. In short, almost all difficulties with the mechanical operation of these and other record players and changers are caused quite simply by oxidation. That is, the reaction of various organic compounds such as grease and rubber with the the atmosphere over time, causing unwanted changes that uiltimately result in their not being able to perform the task for which they were intended. Replace those deteriorated items with fresh ones and correct operation usually resumes. Let's look at some common problems with the BIC Model 940 (and others) and how they may be solved. I should add that the mechanical parts I refer to are named by me according to their apparent function and may not correspond to the nomenclature used by the company in their literature. Someone has commented that the record size select lever is mis-identified in the photos, that it should be the one with "steps" in it.
Preliminaries and Safety First!
If you're experienced in mechanical repairs you can probably skip this part, but if you're not mechanically inclined please pay attention. There is a certain degree of danger in this process of repair, namely of something hitting you in the eye. This can be a clip or a coil spring that flies off under tension, or a mis-directed spray or stream of liquid. Therefore, I strongly suggest wearing eye protection and keeping those who do not have it well away from the work area. As parts under tension can go flying, try working in an area where such wayward items will stand a good chance of being found again. Finally, lining up each part, in order of removal and in a safe place will help greatly in the reassembly process. You may also wish to make notes or drawings so that you can get things reassembled correctly. It is important when undertaking the repair procedures that the changer mechanism is in its "rest" position. That is, where it would be when the record changer had finished playing its last record and had shut itself off. You do not want it to be stopped part way through a cycle, in other words. This is especially important when removing and reinstalling the platter. By the way, all repairs are done with the power cord disconnected, unless you are checking operation, in which case it will be noted otherwise.
Record changer platter doesn't spin or speed is too slow
(see end of page for helpful photos)
Try rotating the platter by hand, as it should turn with only a slight effort. If great resistance is felt, do not force it as the lubricating grease has likely hardened. Sometimes, it can literally "turn to glue" and you don't want to cause any damage by spinning things that are meant to stay stationary (see last paragraph under this problem). Regardless of the outcome of your test, you'll need to remove the platter to diagnose the problem furthur in the following way:
1) Remove any record spindle from the center by pulling it upwards.
2) Remove the black plastic snap ring that holds the platter down. This can be done by using a pair of snap ring pliers available at auto parts stores, or with a pair of large paper clips that have had their ends bent at a 90-degree angle about 1/8 inch up. Either way, the idea is to hook the two holes and spread the clip apart while lifting it up and out of the groove it's in.
3) If the platter spins easily, simply lift it off. If it turns hard or not at all, you'll need to soften the grease, first. Do this by carefully applying penetrating oil, WD-40 or even lighter fluid or kerosene (from the top) where the platter contacts the main bearing shaft. Let the lubricant penetrate for at least a half hour, try rotating the platter and apply more of the liquid if it is still tight. Repeat this procedure until the platter can be removed.
You will note that there is a belt (usually orange) that runs between an inner rim cast into the platter and the motor pulley. One side of the belt runs through a red plastic speed-changing guide that serves to move the belt up or down on the pulley, depending on the speed selected. I don't know what compound BIC used in their manufacture, but the two original belts in my record changers remain supple and reasonably taut, which is most unusual for a rubber belt. With luck, yours will be, too. Keep the belt from contacting any lubricant and if it does, clean it thoroughly with a paper towel moistened with rubbing alcohol. While original belts are likely not available, a workable substitute such as an FBM15.2 should be able to be found online.
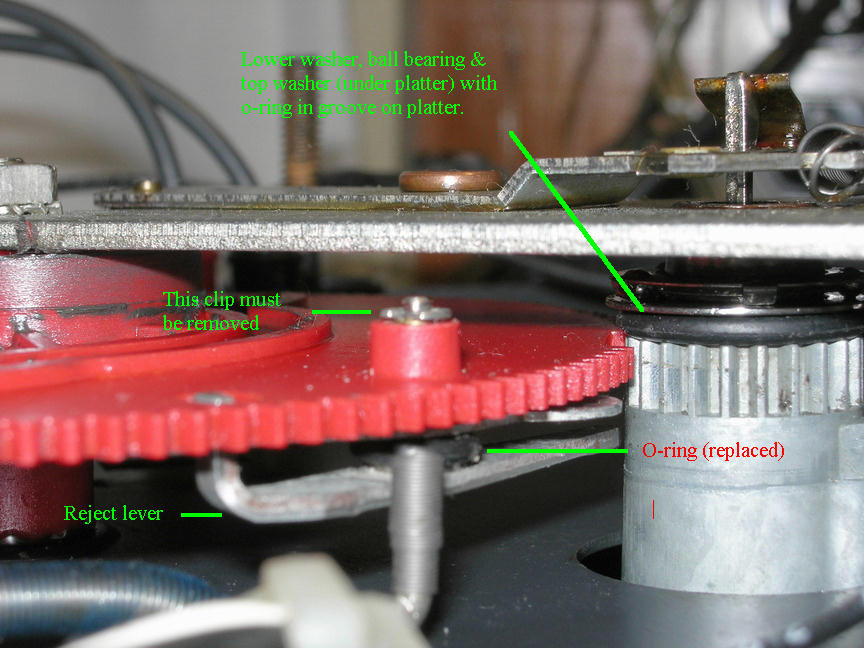
Now is the time to assess the condition of the original grease, even if your platter was spinning freely. Stacked at the bottom of the stationary shaft will be the following items which should be slid up the shaft and removed one at a time, with the exception of the bottom washer:
(possibly a black o-ring, if it's fallen off the bottom of the platter)
a smooth-surfaced washer
a ball bearing
a second smooth-surfaced washer (leave there).
If the grease packed into the ball bearing has hardened, you'll need to remove all the old lubrication in this and on the washers, shaft and platter sleeve bearing (the hole up through the platter). Use any of the solvents mentioned earlier in conjunction with a toothpick, cotton swabs and a paper towel or two to accomplish this task. Once the old grease has been removed, apply new lubricant and slide the bearing and top washer back onto the shaft. Also lubricate the shaft and inner surface of the platter bearing using a cotton swab. A light grease is preferred, but motor oil should also work. I wouldn't recommend a thin, household-type oil, though.
While the platter is off you can check the operation of the motor by connecting the power cord and sliding the lever forward to the "manual" position. If the pulley spins, it is likely okay. If not, you may have a bad switch or power cord that should be investigated. When turned by hand with no power applied, the motor pulley actually should not spin especially freely, but rather, there should be some resistance--a sort of "cogging" effect due to the action of the 24 magnetic poles inside. If it turns really hard or seems frozen in place, you will need to attempt to free the shaft. As this is a sealed, synchronous motor similar to those used in electric clocks for years, any repair will likely be limited to working a tiny bit of WD-40 or the like into the top bearing underneath the pulley. If this helps free things up, follow it by an tiny application of very light oil in the same spot. I should add here that the height of the pulley on the shaft seems to affect the platter speed to a certain degree. If a stroboscope indicates an slight discrepancy, try moving the pulley up or down after loosening the setscrew. I think a downward movement increases the speed and an upward one decreases it. However, if the speed is especially slow it is more likely to be a lubrication or belt issue as addressed in this section, or possibly a loose setscrew in the pulley. Be sure to tighten it securely.
I mentioned earlier the possibility of there being a black o-ring above the top metal washer. If there is, this likely came from around a groove at the bottom of the platter bearing, right below the geared portion. While not critical, I believe its purpose is to prevent the platter from spinning on top of the washer and possibly as a rumble (mechanically transmitted noise) dampener. As rubber tends to expand when in contact with hydrocarbons, you may find that, while supple, the ring has swelled to where it won't stay in position in the groove. If this is the case, you may want to replace it with one of a slightly smaller diameter from your local hardware store or home center. Another o-ring that will likely need to be replaced is addressed in a later section.
If it hasn't been done already, clean the belt by running it through a folded paper towel moistened with rubbing alcohol. You may also wish to clean the motor pulley and inner rim of the platter. To reassemble the platter, loop the belt around the inner rim and hold it taut, pulled toward the motor pulley with two fingers. Begin to slide the platter over the shaft, while at the same time hooking the belt over the motor pulley. This can be a tricky thing to do and you may find it necessary to enlist the services of a helper. You may wish instead to construct a tool from a foot long piece of coathanger wire formed into a V. Bend the last quarter inch or so of the two ends up at a 90-degree angle and use them, held apart, to pull the belt over the pulley. After operating the record changer to see that all is in order, the final step is to replace the black plastic snap ring so that the platter will remain in position when it is turned upside-down. Note that this has a tab that needs to be positioned in such a way that it fits in the groove that is made for it.
I should mention one other thing, which I understand can sometimes occur when the turntable platter has become "frozen" to the bearing and the whole assembly forcibly rotated. You'll know this has occured if the center stacking spindle turns along with the platter and there's a lot of "rumble" in the audio, or records aren't dropping properly because the spindle has been rotated out of its proper position. If this has occured, you'll need to do the disassembly and cleaning/lubrication mentioned above, as well as re-securing the center bearing in the appropriate position. When it is oriented correctly, the vertical groove in it (which accepts the pin on the stacking spindle) should face about 30 degrees clockwise from the back of the mechanism. In this way, the "lip" of the record stacking spindle on which the records rest will be lined up with, but exactly 180 degrees opposite the record support in the corner. You'll likely need to cement the bearing in place, after thoroughly cleaning the area of any oily residue.
Record doesn't reject and/or tonearm bounces back at end of record
(see end of page for helpful photos)
This common problem is caused by the hardening of a tiny (white) o-ring on the reject lever. The function of this rubber o-ring is to supply a slight amount of friction between itself and the metal plate resting above it. When the tonearm reaches the end of the record the plate moves and slightly rotates the reject lever, causing one end to catch a protrusion on the outside of the platter bearing. This starts the main gear rotating and the changer cycles. The friction created by the o-ring is necessary since the plate and lever cannot be connected directly together - a certain amount of slippage is necessary. When the rubber hardens, too much slippage may result and the record won't reject. On the other hand, if the hardening tends to cement the o-ring to the metal the lack of slippage will cause the tonearm to bounce back onto the record each time it attempts to reject.
One narrowly does not have to remove the main mechanism gear in order to effect a repair. Instead, do the following:
1) With the record changer turned upside down, carefully remove the circlip securing the shaft of the reject lever and work it out from underneath the red plastic gear. This may take some fanagling.
2) Using one of the liquids mentioned earlier, clean all old lubricant from the shaft and bushing.
3) Clean the surface of the metal plate where the o-ring contacts it with a cotton swab moistened with rubbing alcohol.
4) Pull the old o-ring off and replace it with one measuring 11/32 x 7/32 x 1/16, such as Danco stock no. 35761B.
5) Carefully wipe the reject lever's shaft with a small piece of paper towel moistened with a drop or two of very light oil. Do not over-lubricate!
6) Reinsert the lever back through the metal plate and the plastic gear. This may require the use of a pair of tweezers. Note the bent end of the lever must fit in the cutout in the plastic wheel. While holding the lever in position, re-install the circlip.
Tonearm drops part way into albums
(see end of page for helpful photos)
This is another case of hardened grease interfering with proper mechanical operation. In this case, it involves the lever that determines how far inward the tonearm moves, as determined by the setting of the speed selector. Although a fair amount of disassembly is required to effect a (hopefully) lasting cure, it is worth the effort as I can tell you from experience that simply applying new lubrication over old won't hold up. Here's what you need to do:
1) With the record changer upside down, remove from the post the following: circlip, spring, washer and small metal piece and set them aside.
2) Lift off the tonearm control lever.
3) Remove lower circlip and spring and set them aside. This will allow you to lift the metal levers enough to clean between and beneath them.
4) Using cotton swabs moistened with one of the hydrocarbon liquids mentioned earlier, thoroughly clean all the old lubricant from the levers and shaft around which they pivot. Also clean between the bottom of the record size select lever and the red plastic plate.
5) Using a cotton swab moistened with a light oil, re-lubricate the above areas.
6) Reassemble the parts in reverse order. Make sure the peg at the end of the tonearm control lever seats into the groove on the plastic gear.
Last two records drop together
(see end of page for helpful photos)
I'm not certain this is a common occurance, but I'll tell you how to cure it should it happen. There is a spring-loaded clamp on the top of the record support. This applies some downward pressure against the record stack which, in conjunction with the weight of the records, keeps more than one disc from dropping at a time. However, when down to just two records the pressure may not always be sufficient. What I did on my two BIC 940 changers was to add a bit of liquid vinyl to the lip underneath the front edge of the clamp. This has the benefit of adding increased friction resistance against the top disc. Liquid vinyl is available at hardware stores and home centers, will likely be made by Plasti-Dip and may be sold in a small can as a liquid electrical tape. It is possible a caulk that retains a rubber-like consistency could also be used.
Records don't drop at all or only intermittantly
(see end of page for helpful photos)
Barring a mechanical issue under the changer (such as a broken or bent part or one out of position), this is most likely the result of the record stacking spindle not being inserted fully into the changer. Sometimes, when unloading played records, the spindle will get pulled up slightly. Check to be certain it is fully seated and cannot be spun around. There is a peg that fits in a slot that will prevent the latter from occuring when it's in its proper position. Also make sure the black plastic snap ring is properly oriented with its tab in the slot, as this helps lock in the spindle. If you find the spindle rotating along with the turntable platter, you have a loose center bearing. See the last paragraph under the first symptom, above, for the fix.